
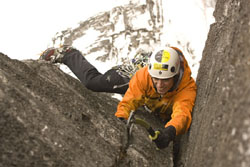
02/04/06: More New Mixed Routes on the Stanley Headwall
 The
Stanley Headwall in Kootenay National Park is one of the best multi-pitch
ice and mixed climbing venues in the world. I have been to the Headwall
over 70 times to climb classics like Nemesis, Suffer Machine and French
Reality as well as establish 16 new routes. Some climbers may consider
Stanley climbed out but this winter (2005/2006) I managed to open four
more mixed lines with various partners. Winter comes early to the Canadian
Rockies so by mid-October Louis-Julien Roy, Joe Buszowski and I began
working on a couple new drytooling pitches up at the Thriller Cave at
the far end of the Headwall. The Thriller Cave is home to 10 bolted
mixed routes ranging from M9- to M11 all on steep, quality rock and
cool ice formations. Miracle Filler (M9) starts at the same first bolt
as Miller Swiller but goes straight up for 10 bolts of overhanging pump
management. The other new route, Caterpillar (M10), offers awesome movement
and endurance climbing for 30m (11 bolts) up a 120 degree wall.
The
Stanley Headwall in Kootenay National Park is one of the best multi-pitch
ice and mixed climbing venues in the world. I have been to the Headwall
over 70 times to climb classics like Nemesis, Suffer Machine and French
Reality as well as establish 16 new routes. Some climbers may consider
Stanley climbed out but this winter (2005/2006) I managed to open four
more mixed lines with various partners. Winter comes early to the Canadian
Rockies so by mid-October Louis-Julien Roy, Joe Buszowski and I began
working on a couple new drytooling pitches up at the Thriller Cave at
the far end of the Headwall. The Thriller Cave is home to 10 bolted
mixed routes ranging from M9- to M11 all on steep, quality rock and
cool ice formations. Miracle Filler (M9) starts at the same first bolt
as Miller Swiller but goes straight up for 10 bolts of overhanging pump
management. The other new route, Caterpillar (M10), offers awesome movement
and endurance climbing for 30m (11 bolts) up a 120 degree wall.
In December, Dave Thomson and I fired Dawn of the Dead (M8+ WI6, 140m) which I previously posted (click here to check out the route description).
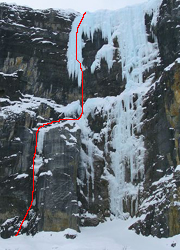 During
these forays, I noticed that an ice dam had formed on top of Nemesis
pushing the water flow left and forming a massive blue pillar pouring
from the top of the cliff. It didn’t take much effort to talk
Shawn Huisman into checking out this newly formed line. It took 3 days
of work to place some bolts and anchors and clean some of the pitches
but the effort was worth it. On the fourth day, we climbed Rhamnusia
(M8 WI6) which involved five very unique pitches:
During
these forays, I noticed that an ice dam had formed on top of Nemesis
pushing the water flow left and forming a massive blue pillar pouring
from the top of the cliff. It didn’t take much effort to talk
Shawn Huisman into checking out this newly formed line. It took 3 days
of work to place some bolts and anchors and clean some of the pitches
but the effort was worth it. On the fourth day, we climbed Rhamnusia
(M8 WI6) which involved five very unique pitches:
P1) The Trad Pitch M7, 30m. Climb an iced-up chimney
then step right (fixed angle) to a steep splitter crack system up a
black stippled corner. Pick slots and torques climb this aesthetic feature
to a ledge and 2-bolt belay. A 2nd fixed angle is near the bottom of
the corner and a 3rd at the top before the snowy exit groove. Note:
Another unexplored option from the top of the chimney is to climb straight
up the left-facing corner then move left around the roof to an iced-up
groove. Either way will get you to the same place.
P2) The Stubby Pitch M5 WI5, 30m. Climb a slab past 2 bolts to the ice
smear. At the roof clip another bolt then pull onto the vertical sheet
of featureless ice. Belay on the snow ledge at 2-bolts. 13-cm screws
are required for this pitch.
P3) The Tunnel Pitch M3, 35m. Trudge up the snow ledge and enter the
tunnel formed by ice mushrooms. An easy chimney with a vein of ice deposits
you at a ledge on the right and 2-bolt anchor. A #3 Camalot (and maybe
a stubby) is the only piece you need for this pitch. The cam fits perfectly
under the roof in the chimney.
P4) The Loose Pitch M8, 25m. Step back left to the ice vein then clip
the first of 12 bolts. Slightly overhanging drytooling gains a 2-bolt
anchor in an ice cave behind the upper pillar. This pitch has lots of
creaky holds but is well protected.
P5) The Ice Pitch WI6, 35m. Slog up the steep blue pillar to the top.
Belay off of ice screws.
Rack: 2 - 60m ropes, Camalots #.1 to #3, Stoppers, Ice screws including 1 - 10cm and a few 13cm. no pins required. 3 bomber angles are fixed on P1 and the rest is either sinker gear or bolts.
Descent: Rappel from V-thread then from 2-bolt ring anchors. A couple leaver-biners were left on bolts on P4 to facilitate getting back to the belay. The other option is to rappel straight from the top of P4 to the top of P2.
Enjoy!
-Sean Isaac
copyright 2004: SeanIsaac.com